Open an existing or new Chart Note for the patient.
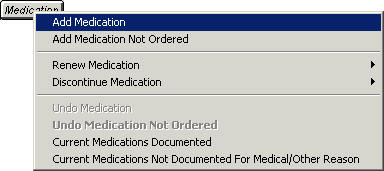
Click the Medication
button, and then select Add Medication.
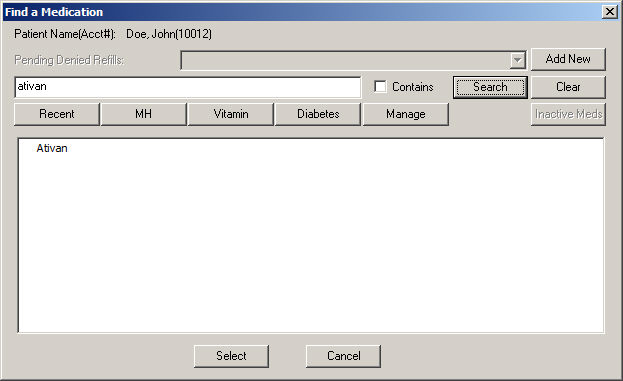
In the Find a Medication dialog you are able to
Search for medications, Select a recently prescribed medication,
Add
a New Medication
(should a particular medication not be in the First DataBank), Create
Prescription Categories,
Manage
Prescription Categories for Medications,
or view any Inactive Medications that are contained within your search.
The Find a Medication dialog will display the 33 most recent medications
prescribed. Likewise, you are able to select different user-defined Categories
by clicking the appropriate category button (MH, Vitamin, and Diabetes
buttons in the figure below). Medications that were manually added to
the system will have a  beside them.
The Inactive Meds button will become accessible when your search criteria
contains any medications that have no active forms and have been retired,
replaced, or inactive, and thereby discontinued. If you click the Inactive
Meds button a Discontinued Medications dialog will appear listing all
of the discontinued medications that are contained in your search criteria.
To select a medication from this list, highlight the applicable Medication, and then click the Select button.
To search for a medication type in the first few letters of the medication,
and then click the Search button.
The system will then display the results of your search. You can then
highlight the applicable Medication,
and then click the Select button.
In the Prescribe Medication dialog the information
for the medication will be populated. Controlled substance medications
will show the particular Schedule type (II, III, IV, etc.) in parentheses
prior to the medication name. Generic drugs will appear with (Generic)
attached to the end of the drug name, while over-the-counter drugs will
be appended with an (OTC) at the end of the drug name. Brand name drugs
will have the additional (Brand) text attached.
If the Inactive Meds button
is accessible there are variants of the medication that have been become
inactive, replaced, or retired. To view the inactive, replaced, or retired
forms of the medication, click the Inactive
Meds button.
If you would like additional information about the medication being
prescribed, you can click the Medication
Info button at any time. Once the medication information is displayed,
you have the option of printing it. Please note, however, that this information
comes from First DataBank, therefore, manually entered medications will
not include this information.
The Medication History Consent
button will display the patient’s current level of consent (Not Asked,
Yes, or No), and allows access to the Consent dialog to configure consent.
Click the Medication History Consent
button to configure
medication consent for the patient.
The Medication Eligibility
button allows access to Medication Eligibility Coverages dialog where
you can view eligible coverage information for the medication. This information
can also be accessed on demand for the patient by clicking Chart
> Medication Eligibility when the patient's chart is opened.
The Medication History button
allows access to the Medication History dialog where you to view medication
history for this from the patient from the SureScripts Network. Click
the Medication History button
to view
medication history for the patient.
Do note, medication history information can also be accessed for viewing,
as well as reconciled and imported, for the patient by clicking Chart > Medication History when the
patient's chart is opened.
The Formulary section of the Prescribe Medication dialog will contain
formulary information including coverage, copay, drug alternatives, representative
NDC alternatives, status and exclusions for the selected medication. Select
the Payer in the corresponding
field, if applicable.
The bottom portion of the Prescribe
Medication dialog will have a Physician
Care banner that contains information specific to the medication
being prescribed, and could change if the route and dosage is changed.
Likewise, if there is additional information, you can click on the banner
and it will open to a webpage that has more detailed information regarding
that specific medication.
In addition, if the medication has been previously prescribed the previous
information will default into the applicable fields.
Select the Route
and Form for the medication you
are prescribing.
Select the Action,
and then select or enter the Dose,
Dose Units, and Frequency
as needed.
NOTE: When whenever prescribing an oral liquid mediation, the Dose
Units field will be set to the oral form and the filed will be locked.
NOTE: When prescribing topical drugs (i.e., Bactroban topical cream)
the Action field will default to Apply,
and the Dose and Dose Units fields are not required to complete the prescription.
NOTE: Click the Dose Calculator
button to access the Dose
Calculator dialog
that allows you to enter proper dosage information along with the drug
concentration and calculate the proper dosage based on the patient’s weight.
In the Dispense field, enter the Amount
or Quantity of Medication to dispense for the prescription, and
then select the Dispense Unit
in the adjacent drop-down list to further qualify the amount or quantity.
NOTE: The Dispense Unit (Capsule, Tablet, Box, etc) must be selected
in order to complete the prescription. If a Dispense Unit is not selected,
a warning will appear and you will not be allowed to proceed until one
is selected.
NOTE: When whenever prescribing an oral liquid mediation, the Dispense
units will be set to Milliliter and the filed will be locked.
In the Add'l
SIG field, enter or select any additional free-text information
that needs to be attached to the SIG. When information is entered or selected
in this field the SIG field will automatically be populated with the text.
Do note, however, that there is a 140 character limit to the entire SIG
field (the original SIG plus any text entered in the Add'l SIG field).
You have the ability create
and modify predefined additional SIG text
by clicking the Edit button. This
allows you to configure consistent, structured additional SIG text when
prescribing and renewing medications.
Select the number of Refills
for the prescription.
Check the Substitution
OK option to remove DAW from the Dispense as Written box on the
prescription.
The Days Supply
field should contain the number of days for which the patient will have
an adequate supply of the medication prescribed. Whenever the Dose,
Frequency, Dispense
and Refills fields have been entered,
the Days Supply field will be
automatically calculated. The calculation does not occur if a previously
saved medication already had a Days Supply value, however, calculation
resumes once one of the aforementioned fields are modified. Likewise,
if you modify the Days Supply field then the field is not recalculated
until the next time the Prescribe Medication dialog is accessed. Enter
or modify the Days Supply as needed.
NOTE: When the Next button
is clicked, the system will check the Days Supply field and produce a
Days Supply Mismatch warning message when the calculated Days Supply (based
on the Dose, Frequency, and Dispense values) conflicts with the information
entered in Days Supply field. You can click the Yes
button to continue with the mismatched days supply, or click No
button to return to the Prescribe Medication dialog and update the applicable
information.
NOTE: When you are prescribing a Schedule II Controlled Substance,
and the Next button is clicked,
the system will check the Days Supply field and produce an Invalid Data
warning message, and you will not be able to continue, if the Days Supply,
either entered manually or calculated by the system, is greater than 90
days. Likewise, a similar warning will appear if the Days Supply field
contains a zero.
Enter any applicable Max
Dose as needed.
In the Notes
to Pharmacist field, enter any Additional
Information you wish to document regarding this prescription being
sure not to include any clinical information.
NOTE: Be sure the additional information you are adding in the Notes
to Pharmacist field does not conflict with the information in the SIG
field. The information should complement, qualify, and/or supplement the
information SIG field.
NOTE: Whenever you are prescribing GHB (Xyrem), the system will enter
“GHB:” in the Notes to Pharmacist field, and you will need to append this
with a medical reason for prescribing this drug. If a reason is not entered,
you will not be able to continue prescribing the drug.
NOTE: Whenever you are prescribing a drug for detoxification treatment
(Suboxone, Zubsolv, etc.), the system will enter “NADEAN:” in the Notes
to Pharmacist field, and you will need to append this with and applicable
NADEAN number. If an NADEAN number is not entered, you will not be able
to continue prescribing the drug.
In the Transmission field, select Hand
prescription to the patient or E-Prescribe,
depending on the manner in which the prescription will be transmitted.
Select a Diagnosis
to be attached to the drug being prescribed, if applicable. The diagnosis
list will contain any diagnoses that are on the patient's Face Sheet.
If another diagnosis needs to be selected click Other...
and a Diagnosis Search dialog will appear that allows you to perform an
ICD10 Search, an ICD9 Search, or use the Crosswalk feature to locate and
select the diagnosis that should be attached to this prescription. If
a diagnosis is selected, it will be appended to the end of the Sig or
Notes when printed as well as inserted into the Chart Note.
Check the Sample
if any sample medication was given with the prescription. This opens the
Lot # and Expiration
Date fields, enter this information if applicable. When this option
is selected, the Face Sheet will display whether or not a drug was a sample
by having the word "Sample" written into the drug name. This
information also has to be written to the note and tracked in the History
tab.
Check the Administered
during visit option to indicate that the medication was administered
during the visit. When this option is selected the Ended date will automatically
be selected and tomorrows date will default. The Administered during visit
option will also appear in the Confirm Prescription dialog and will be
checked or unchecked depending upon how it was configured in the Prescribe
Medication dialog. If this option is checked in Confirm Prescription dialog,
the Prescription section will be grayed out and will not be able to be
queued to print or E-prescribe. Once confirmed, the medication information
will appear in the note and patient’s facesheet with an Administered During
Visit note beside the medication.
Check the Print
patient prescription savings materials if you want any applicable
patient saving (ScriptGuide and eCopay) materials to print for the patient
when available for the medication being prescribed. When this option is
unchecked, the system will not print any applicable patient saving materials.
NOTE: This option will default checked for all medications prescribed
via a chart note. When prescribing medications via the patient’s facesheet,
this option will default, checked or unchecked, based on how the
Print prescription savings material when prescribing from the Facesheet
preference is configured.
Enter or modify the Started
and/or Ended date as needed.
NOTE: When adding pre-existing medications for a patient, where the
Started field is left blank, the system will list the medication as a
pre-existing medication in the chart note, but will not indicate any prescribed
by or added by text in the chart note. If pre-existing medications were
entered in legacy versions of ChartMaker®
Clinical, and those chart notes had been signed, then the prescribed by
or added by verbiage will still remain in the chart note. However, if
the chart notes from a legacy version of ChartMaker®
Clinical were not signed, then the system will remove the prescribed by
or added by text for pre-existing medications.
NOTE: When adding pre-existing medications for a patient, where the
Started field is left blank, the system will disable the ePA functionality
and all ePA options will be removed from the Prescribe Medication dialog.
Likewise, the Earliest Fill Date field will change to an Est.
Start Date field, allowing you to enter the estimated start date
for the pre-existing medication. To enter an estimated start date, simply
check the Est. Start Date, and
enter the estimated start date. When an estimated start date is entered,
the system will use that date for any exclusion cases when calculating
applicable CQMs for Meaningful Use.
When an estimated start date is entered for a pre-existing medication,
it will be displayed in the context menu accessed via the facesheet. If
an Estimated Start Date was not configured, the system will show a question
mark (?) in the corresponding field in the context menu. In addition,
the context menu will also contain a Date Entered field that will display
when the pre-existing medication was entered.

Enter or modify an Earliest
Fill Date, if needed. The Earliest Fill Date field allows you to
configure the earliest fill date for Schedule II controlled substances.
This field is required whenever you prescribe a Schedule II controlled
substance. This field is also enabled when prescribing non-Schedule II
medications, but is not required for those medications.
NOTE: When you are prescribing a Schedule III or Schedule IV Controlled
Substance, and the Next button
is clicked, the system will check the Earliest Fill Date field and produce
an Invalid Data warning message, and you will not be able to continue,
if the Earliest Fill Date is greater than 6 months from today's date.
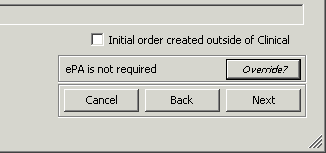
Check the Initial
order created outside of Clinical option to indicate that the initial
order for this medication was generated outside of the Clinical application.
When this option is selected the medication will not be included within
the numerator for the CPOE Query for Meaningful Use Stage 2.
An ePA status indicator (ePA
is required or ePA is not required)
will appear below the Initial order created outside of Clinical option
for registered ePA Providers based on the Formulary information.
When the ePA is required status
is activated this will begin to trigger the process of electronic prior
authorization that will continue in the Confirm Prescription dialog. An
Override? button is available
that allows you to forgo the ePA workflow for circumstances where the
formulary information is indicating that ePA is required for the medication,
but the user knows that this it is not truly required. When the Override? button is clicked, the system
will indicate that the ePA is user-cancelled, and an Undo?
button will appear to cancel this action. When the override is activated,
and you click the Next button,
you will proceed with the typical workflow for prescribing medications
without a prior authorization, and the Confirm Prescription dialog will
also indicate that the ePA is user-cancelled.
When the status is ePA is not required, an Override?
button will be available allowing you to trigger the electronic prior
authorization workflow. When the Override
button is clicked the status will change to ePA
is user-requested, which will then
trigger the process of electronic prior authorization that will
continue in the Confirm Prescription dialog.
Once all of the prescription information has been
entered, it is recommended that you review the information in the SIG field for accuracy and to be sure
there is no conflicting information. The SIG field contains the concise
instructions for administering the drug to the patient as it was configured
in the Action, Dose,
Dose Units, Frequency,
and Additional SIG fields above.
This is the information that the pharmacy receives for filling the patient's
prescription.
After the SIG field is reviewed and is correct, click the Next
button.
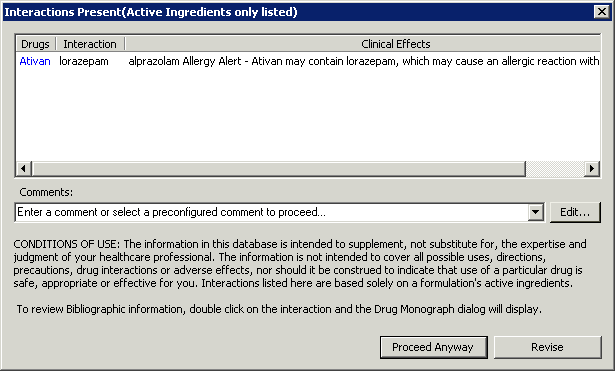
NOTE: When configuring the prescription information if there are any
applicable drug to drug, drug to allergy, or drug to disease interaction
warnings, an Interaction Present dialog will appear outlining the warning.
Click the Revise button to return
to the Prescribe Medication dialog to change or cancel the prescribed
drug, or enter or select a Comment,
and then click the Proceed Anyway
button, which allows you to continue with prescription and override the
warning. The comment will then be inserted into the Chart Note. If a comment
is not entered or selected, a warning dialog will appear, and you will
not be allowed to proceed until a comment is entered or selected.
You have the ability create
and modify predefined comments
by clicking the Edit button. This
allows you to configure consistent, structured comment text when overriding
various drug interactions.
NOTE: When prescribing a medication, if medication database is out
of date, an alert message will pop-up indicating that the medication database
is out of date and therefore, no drug interactions can be performed.
In the Confirm Prescription dialog the medication
information, along with all information that will be included in the prescription,
will be summarized offering you the opportunity to review the information
before you confirm the prescription.
It is recommended that you pay particular attention to the information
in the SIG field for accuracy.
The SIG field contains the concise instructions for administering the
drug to the patient as it was configured in the Prescribe Medication dialog
and summarized in the Medication section of the Confirm Prescription dialog.
This is the information that the pharmacy receives for filling the patient's
prescription.
If you need to change the prescription information, click the Revise button. This will take you back
to the Prescription Medication dialog.
If the Administered during visit
option is checked in Confirm Prescription dialog, the Prescription section
will be grayed out and will not be able to be queued to print, E-prescribe,
or fax. Once confirmed, the medication information will appear in the
note and patient’s facesheet with an Administered During Visit note beside
the medication.
When prescribing controlled substances the Location
field will become active when there are multiple locations allowing you
to select the proper location, and thereby the applicable DEA Number,
when sending the e-prescription. With the implementation of EPCS each
provider/practice location has a DEA Number attached to it.
You can then modify the prescription Destination,
if needed. If the Destination is set to E-Prescribe, you must select a
Pharmacy before you can confirm
the prescription. If the pharmacy is not listed in the Pharmacy drop-down,
you can click the Manage
patient pharmacies
button to find and select the applicable pharmacy for the patient.
The bottom portion of the Confirm
Medication dialog will have a Physician
Care banner that contains information specific to the medication
being prescribed. Likewise, if there is additional information, you can
click on the banner and it will open to a webpage that has more detailed
information regarding that specific medication.
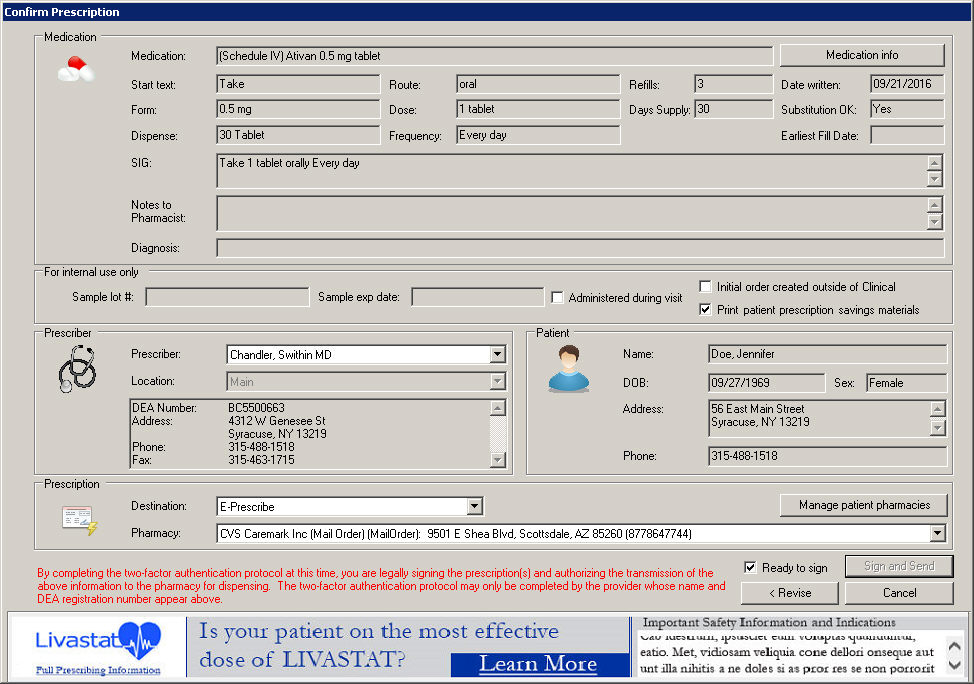
When the status is ePA is required
or ePA is user-requested the Destination
will default to On Hold and there
will be an EPA icon underneath the Prescription section heading. If you
click the Confirm button you will
initiate the electronic prior authorization process for this medication.
You can then view
and process the ePA request
as information becomes available.

To confirm the prescription for a medication that does not require
ePA, click the Confirm button
if the destination is Hand prescription to patient, or click the Confirm and send button if the Destination
is E-Prescribe and you are sending a non-controlled substance medication.
If the Destination is E-Prescribe and you are e-prescribing a controlled
substance, you must complete the two-factor authentication protocol. Check
the Ready to sign option which
will activate the Sign and Send button. You must now have your IndenTrust
token plugged into your computer. Once the token is plugged in, click
the Sign and Send button.
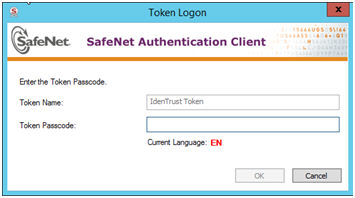
The system will then validate the security certificate with the IdenTrust
token inserted into the USB port of your computer. If the certificate
and token match, you will be promoted to enter your token password. Once
the password has been entered, click the OK
button.
NOTE: When you click the Ready to
sign option, if the provider in the Prescriber field is not set
up for EPCS, then a warning message will appear stating that this provider
is not authorized to E-Prescribe controlled substances and you will not
be able to continue.
NOTE: If the IndenTrust USB token is not plugged into the computer
when you click the Sign and Send
button, the system will produce a warning message indicating that the
token is not plugged in and you will not be able to continue.
Repeat steps 2 - 24 to add another medication for the patient.