Click Edit >
Preferences.
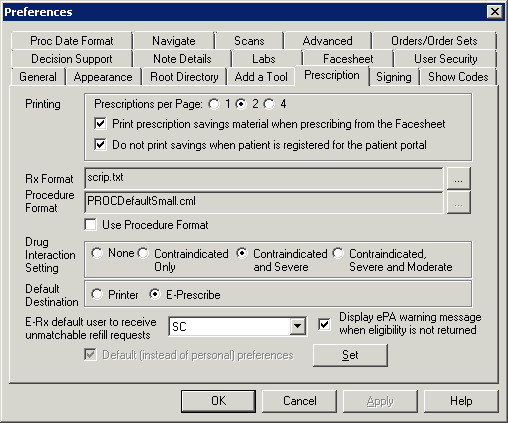
Click the Prescription
tab.
In the Printing section, select the Prescriptions
per Page, and then check the Print
prescription savings material when prescribing from the Facesheet
option and/or the Do not print savings
when patient is registered for the patient portal option, if applicable.
When the Print prescription savings
material when prescribing from the Facesheet option is checked,
the Print patient prescription savings
materials option in the Prescribe Medication dialog will default
as checked when prescribing and renewing medications via the patientís
facesheet. When this option is unchecked, the Print
patient prescription savings materials option will default unchecked
when prescribing and renewing medications via the patientís facesheet.
You have the ability to override this option on an individual basis in
the Prescribe Medication dialog. This allows you to choose whether or
not to print applicable patient saving (ScriptGuide and eCopay) materials
when prescribing and renewing medications via the facesheet when the patient
is typically not present.
When the Do not print savings when
patient is registered for the patient portal option is checked,
and a patient is registered and activated for the ChartMakerģ PatientPortal,
the Print patient prescription savings
materials option in the Prescribe Medication dialog will default
as checked when prescribing and renewing medications. When this option
is unchecked, the Print patient prescription
savings materials option will default unchecked when prescribing
and renewing medications. You have the ability to override this option
on an individual basis in the Prescribe Medication dialog. This allows
you to choose not to print applicable patient saving (ScriptGuide and
eCopay) materials when prescribing and renewing medications if a patient
is registered and activated for the ChartMakerģ PatientPortal, as applicable
patient saving materials are automatically uploaded to the patientís PatientPortal
account regardless of how this preference is configured.
In the Rx Format field, browse to the Prescription
Format. The
format is used for printing medical prescriptions and will be based on
your state and the type of prescription paper you are using.
NOTE: Additional fields within the prescription layout are required
when prescribing controlled substances. The Clinical application comes
with six prescription layouts that contain theses additional fields that
are required to successfully prescribe controlled substances: CMDefaultSmallEPCS.cml,
De1EPCS.cml, NjStandardEPCS.cml, NyBlankEPCS.cml, NyStandardEPCS.cml,
and Va1EPCS.cml. Prior to printing prescriptions for controlled substances,
you will need to update the Rx Format field to one of these options.
In the Procedure Format field, the PROCDefaultSmall.cml
file will appear. This field cannot be modified. If the Use
Procedure Format option is selected, the system will use the legacy
PROCDefaultSmall.cml format when printing procedure orders. If the Use Procedure Format option is not selected,
the system will use the default format when printing procedure orders.
In the Drug Interaction Setting field, click the
None, Contraindicated
Only, Contraindicated and Severe,
or Contraindicated, Severe and Moderate
radio button for the level of drug interaction warnings you would like
displayed.
In the Default Destination field, click the Printer or E-Prescribe
radio button to select a default method in which the prescriptions will
be printed or sent. This setting can be overridden on an individual basis
by selecting a different method via the patient's face sheet when printing/sending
a prescription.
In the E-Rx default user to receive unmatchable
refill requests field, select the appropriate User.
Check the Display
ePA warning message when eligibility is not returned option, if
applicable. When this option is activated, an ePA Not Completed warning
message will appear whenever the user clicks the Next
button in the Prescribe Medication screen before the eligibility information
containing the ePA requirement status has been retrieved, and thereby
alerting the user that the ePA functionality may be forgone.
NOTE: The Rx Format, Use Procedure Format, Drug
Interaction Setting, Default Destination,
and Display ePA warning
message when eligibility is not returned preferences are user-specific
settings and will be based upon whichever user is currently logged onto
the system when the change to the preference is made.
Click the Set button.
When finished, click the OK
button.
