Click Edit >
System Tables > Order Sets.
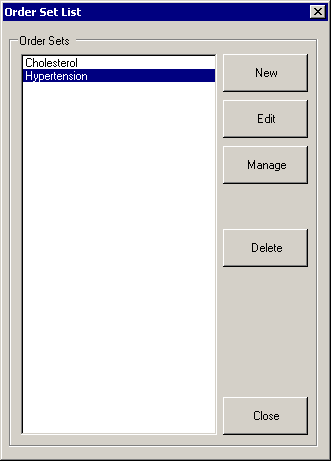
In the Order Set List dialog, highlight the Order Set you want to edit, and then
click the Edit button.
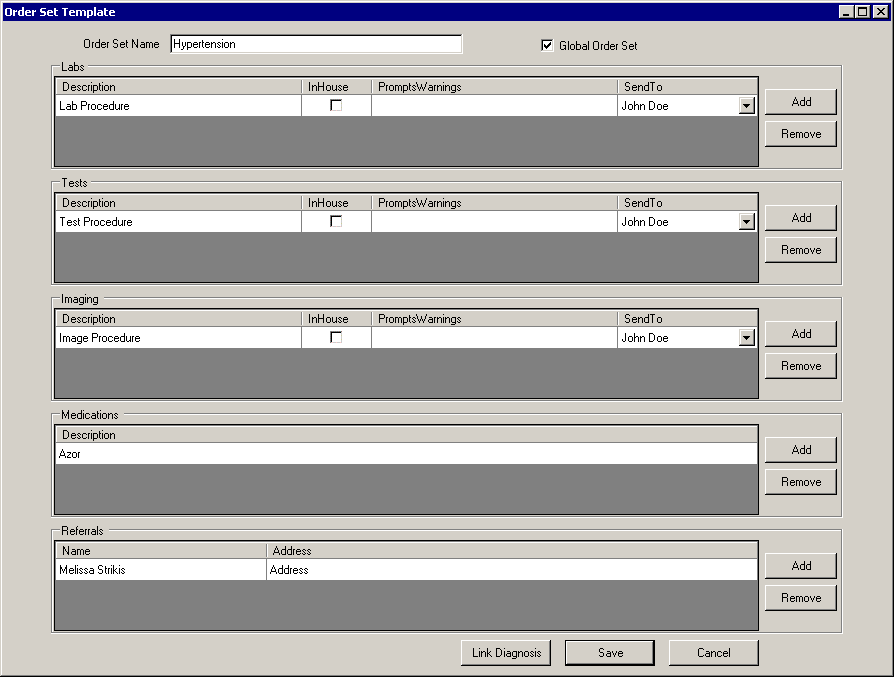
In the Order Set Template dialog, modify the Order Set Name as needed.
Check or uncheck the Global
Order Set option as needed. When
this option is not checked, only
the user who created the order set can view and access the order set.
When checked, all users are able to access and view this order set.
Add any Lab orders for the order set by clicking
the corresponding Add button.
In the Add Lab dialog, search for and select the Lab
Procedure (only procedures with a procedure type of Lab will appear),
and then press the OK button.
Check the box in the In House
column if this procedure is performed in the office. Select the appropriate
User this Lab Procedure should be sent to in the corresponding Send To
drop-down list. Repeat this step for any additional lab orders you want
to add to the order set. To remove a lab order from the order set, highlight
the applicable Lab Procedure and
then click the corresponding Remove
button.
Add any Test orders for the order set by clicking
the corresponding Add button.
In the Add Test dialog, search for and select the Test
Procedure (only procedures with a procedure type of Test will appear),
and then press the OK button.
Check the box in the In House
column if this procedure is performed in the office. Select the appropriate
User this Test Procedure should be sent to in the corresponding Send To
drop-down list. Repeat this step for any additional Test orders you want
to add to the order set. To remove a Test order from the order set, highlight
the applicable Test Procedure
and then click the corresponding Remove
button.
Add any Imaging orders for the order set by clicking
the corresponding Add button.
In the Add Image dialog, search for and select the Image
Procedure (only procedures with a procedure type of Imaging will
appear), and then press the OK
button. Check the box in the In House
column if this procedure is performed in the office. Select the appropriate
User this Imaging Procedure should be sent to in the corresponding Send
To drop-down list. Repeat this step for any additional Imaging orders
you want to add to the order set. To remove an Imaging order from the
order set, highlight the applicable Image
Procedure and then click the corresponding Remove
button.
Add any medications for the order set by clicking
the corresponding Add button.
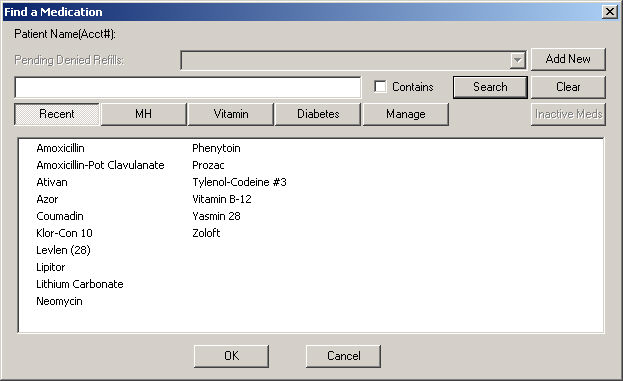
IIn the Find a Medication dialog you are able to Search
for medications, Select a recently
prescribed medication, Add
a New Medication
(should a particular medication not be in the First DataBank), Create
Prescription Categories,
Manage
Prescription Categories for Medications,
or view any Inactive Medications that are contained within your search.
The Find a Medication dialog will display the 33 most recent medications
prescribed. Likewise, you are able to select different user-defined Categories
by clicking the appropriate category button (MH, Vitamin, and Diabetes
buttons in the figure below). Medications that were manually added to
the system will have a  beside them.
The Inactive Meds button will become accessible when your search criteria
contains any medications that have no active forms and have been retired,
replaced, or inactive, and thereby discontinued. If you click the Inactive
Meds button a Discontinued Medications dialog will appear listing all
of the discontinued medications that are contained in your search criteria.
To select a medication from this list, highlight the applicable Medication, and then click the OK button. To search for a medication
type in the first few letters of the medication, and then click the Search button. The system will then
display the results of your search. You can then highlight the applicable
Medication, and then click the
OK button. Repeat this step for
any additional medications you want to add to the order set.
To remove a medication from the order set, highlight the applicable
Medication and then click the
corresponding Remove button.
Add any Referrals for the order set by clicking
the corresponding Add button.
In the Add Referral dialog, select the applicable Referring
Physician, and then press the OK
button. Repeat this step for any additional referrals you want to add
to the order set. To remove a referral from the order set, highlight the
applicable Referring Physician
and then click the corresponding Remove
button.
Click the Link
Diagnosis button to add or modify diagnoses that are linked to
this order set.
In the Order Set Manager dialog, be sure that
the Order Sets tab is selected.
In the Order Set field, select the Order
Set you are modifying.
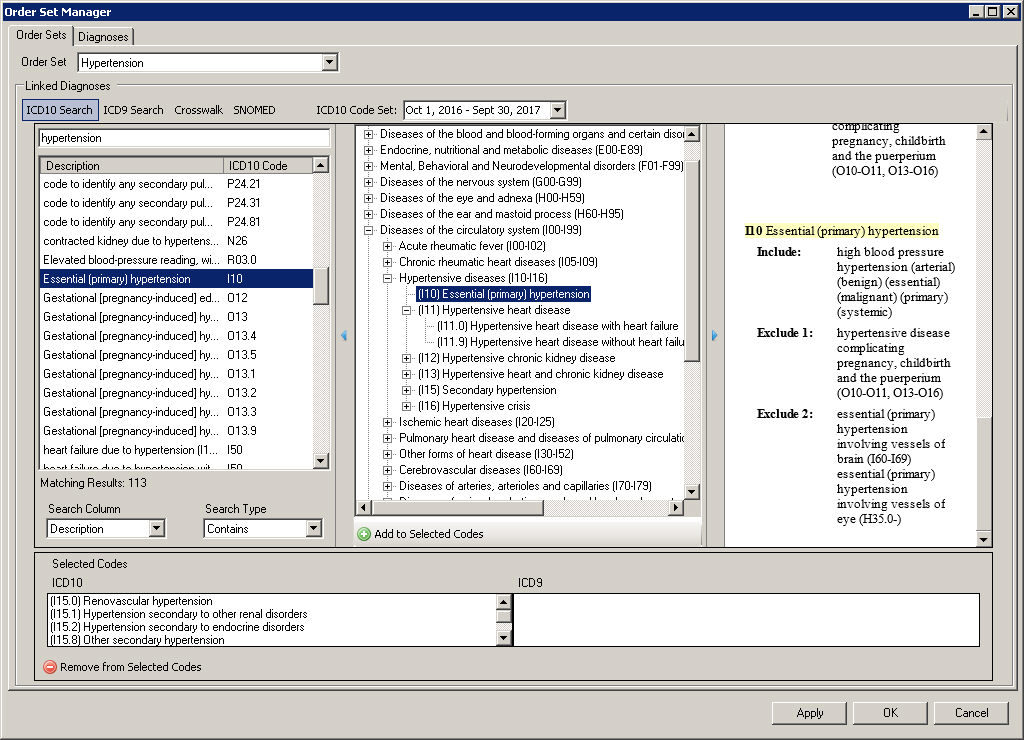
In the Linked Diagnoses section you can perform
an ICD10 Search, an ICD9
Search, use the Crosswalk
functionality (which allows you enter an ICD9 code and then the system
will return the applicable ICD10 code(s) that match that initial ICD9
code), or use the SNOMED functionality
(which allows you to search by a SNOMED description or code to match to
applicable ICD10 codes).
When using the ICD10 Search, Crosswalk, or SNOMED option, an ICD10 Code Set field will be available
allowing you to select the Oct 1, 2014
– Sept 30, 2016 code set, the Oct
1, 2016 – Sept 30, 2017 code set, the Oct
1, 2017 – Sept 30, 2018 code set, or All
ICD10 Codes. This allows you to easily search for the applicable
ICD10 codes that are active, as outlined by the CDC, for the applicable
date ranges. When accessing the Diagnosis Search dialog to link a diagnosis
to an order set, the system will default to the code set based on the
current day’s date.
To perform an ICD10 Search, be sure that the ICD10
Search option is selected above, and then be sure that the correct
ICD10 Code Set is selected. Next,
you can then select the applicable Search
Column and Search Type,
and then begin typing the diagnosis you want to add in the Description
field. The system will return conditions that match that description for
the Search Column and Search Type selected.
Once the applicable code has been located, highlight that code in the
left column, and the applicable code will become highlighted in the diagnostic
tree in the middle column, and the right column will display detailed
information regarding the selected diagnosis. To add that code, click
the Add to Selected Codes button.
The code will then appear in the Selected Codes area under the ICD10 column.
You can then add additional ICD10 codes in a similar manner, or perform
an ICD9 Search, use the Crosswalk, or use the SNOMED search functionality.
NOTE: When adding ICD10 diagnoses codes via the diagnostic tree (middle
column), if you highlight a Diagnosis Category that contains billable
diagnostic codes within that category, and click the Add
to Selected Codes button, all of the codes within that category
will be added. For example, in the figure below, if you select (I11)
Hypertensive heart disease, and then click the Add to Selected
Codes button, the I11.0 and I11.9 codes will be added.
NOTE: You also have the ability to search for specific codes via the
diagnosis tree in the middle column. Likewise, when performing an ICD10
Search, you are able to hide the left and right columns as needed by clicking
the  and
and  buttons.
To perform an ICD9 Search, be sure that the ICD9
Search option is selected above, then select the applicable Search Column and Search
Type, and then begin typing the diagnosis you want to add in the
Description field. The system will return conditions that match that description
for the Search Column and Search Type selected.
Once the applicable codes has been located, highlight that code, and
then click the Add to Selected Codes
button. The code will then appear in the Selected Codes area under the
ICD9 column.
You can then add additional ICD9 codes in a similar manner, or perform
an ICD10 Search, or use the Crosswalk.

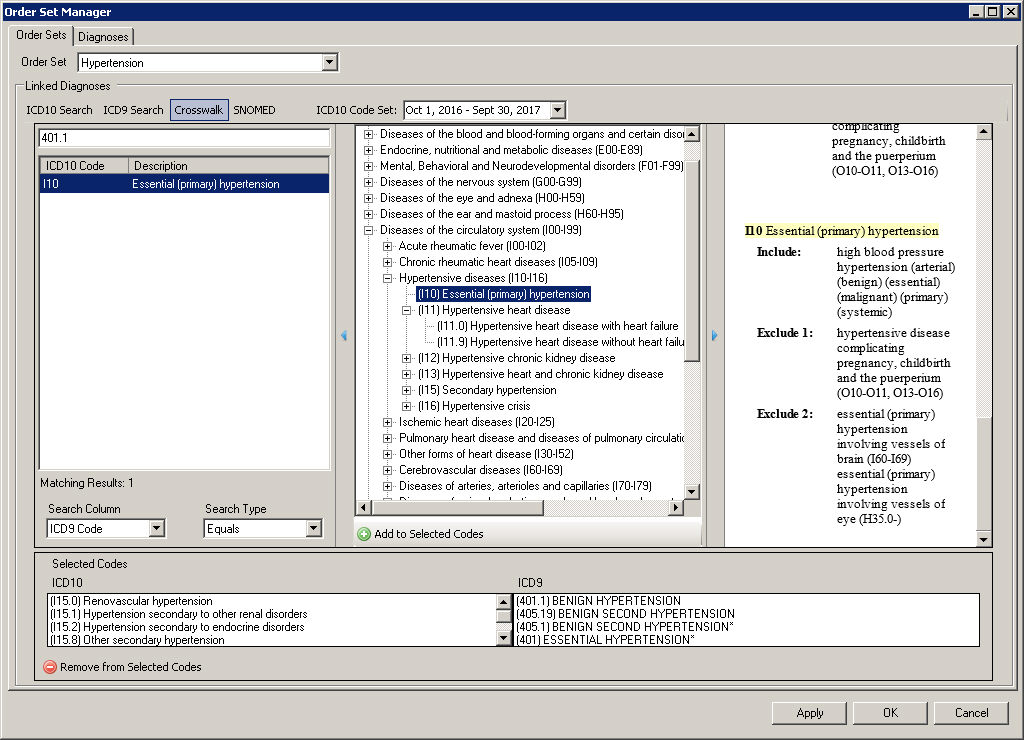
To use the Crosswalk option, be sure that the Crosswalk
option is selected above, and then be sure that the correct ICD10
Code Set is selected. Next, you can then enter the specific ICD9 Code you would like to match to
an applicable ICD10 code. The system will return ICD10 codes that match
that ICD9 code.
Once the applicable code has been located, highlight that code in the
left column, and the applicable code will become highlighted in the diagnostic
tree in the middle column, and the right column will display detailed
information regarding the selected diagnosis. To add that code, click
the Add to Selected Codes button.
The code will then appear in the Selected Codes area under the ICD10 column.
You can then add additional ICD10 codes in a similar manner, or perform
an IC10 Search, an ICD9 Search, or use the SNOMED search functionality.
NOTE: When adding ICD10 diagnoses codes via the diagnostic tree (middle
column), if you highlight a Diagnosis Category that contains billable
diagnostic codes within that category, and click the Add
to Selected Codes button, all of the codes within that category
will be added. For example, in the figure below, if you select (I11)
Hypertensive heart disease, and then click the Add to Selected
Codes button, the I11.0 and I11.9 codes will be added.
NOTE: Similar to the ICD10 Search, you also have the ability use the
the diagnosis tree in the middle column to locate specific diagnosis codes.
Likewise, when using the Crosswalk, you are able to hide the left and
right columns as needed by clicking the  and
and  buttons.
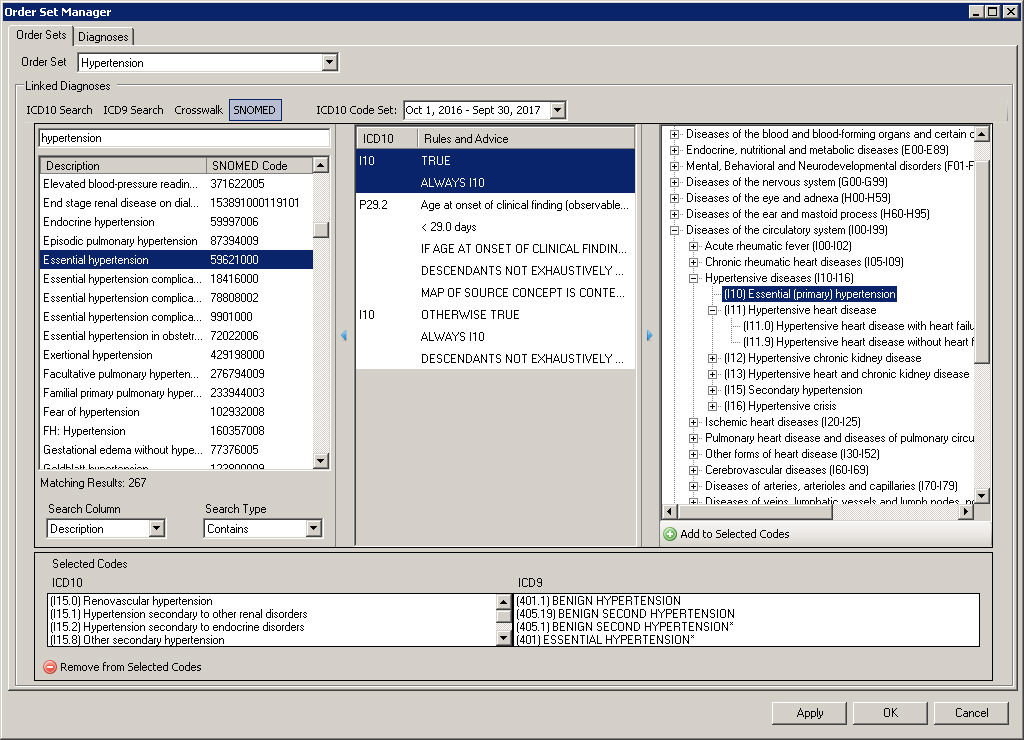
To use the SNOMED option, be sure that the SNOMED
option is selected above, and
then be sure that the correct ICD10 Code
Set is selected. Next, you can then select the applicable Search Column and Search
Type, and then begin typing SNOMED description or code in the Description
field. The system will return conditions that match that description for
the Search Column and Search Type selected.
Once the applicable code has been located, highlight that code in the
left column, and the middle column will contain matching ICD10 codes.
There are three possibilities for matching the SNOMED code to ICD-10 codes
in the middle column: a one to one match, a one to many match, and no
matches.
The right pane will display the ICD-10 code tree, and if an ICD-10
code is selected in the middle column, that diagnosis code will be selected
in the tree. To add that code, click the Add
to Selected Codes button. The code will then appear in the Selected
Codes area under the ICD10 column.
You can then add additional ICD10 codes in a similar manner, or perform
an ICD9 Search, or perform an ICD9 Search, or use the Crosswalk.
NOTE: When adding ICD10 diagnoses codes via the diagnostic tree (right
column), if you highlight a Diagnosis Category that contains billable
diagnostic codes within that category, and click the Add
to Selected Codes button, all of the codes within that category
will be added. For example, in the figure below, if you select (I11)
Hypertensive heart disease, and then click the Add to Selected
Codes button, the I11.0 and I11.9 codes will be added.
NOTE: You also have the ability to search for specific codes via the
diagnosis tree in the right column. Likewise, when performing an SNOMED
Search, you are able to hide the left and right columns as needed by clicking
the  and
and  buttons.
Once the diagnosis codes have been selected as
needed, and appear in the Selected Codes area, you have the ability to
remove any of these codes from the Selected Codes by highlighting the
applicable diagnosis code(s), and then clicking the Remove
from Selected Codes button. When the applicable ICD9 and ICD10
codes appear in the Selected Codes area, as needed, click the Apply button,
and then click the OK button.
In the Order Set Template dialog, click the Save button.
Repeat steps 2 - 15 to edit additional order sets. Click the Close button in the Order Set List dialog when finished.