In the patient's open chart, click Chart
> Medication History.
NOTE: The medication history information is also available through
the Medication History button in the Prescribe Medication dialog, however,
you are not able to import and reconcile medications when accessing via
the Prescribe Medication dialog.
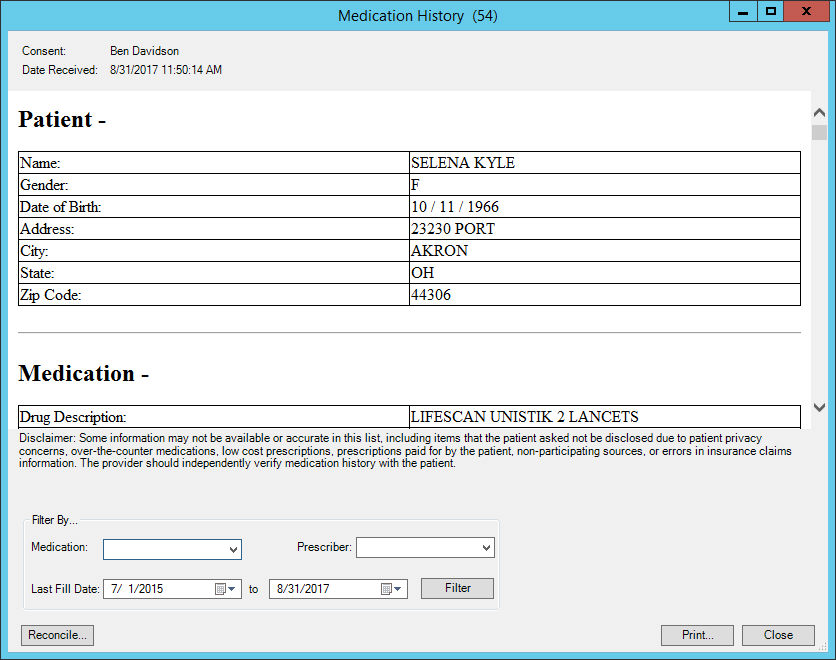
In the Medication History dialog, the patient
basic demographic information will be listed, along with medication history
for that patient. Beside the Medication History title, at the top of the
dialog, the number of medication occurrences will appear in parentheses.
Do note, that when accessing the Medication History dialog, you may
first receive a series of dialogs indicating that the system is gathering
the information, or that the Medication History is pending for the patient.
Likewise, you may also receive dialogs that indicate that there is no
history information available for the patient, or that history information
could not be retrieved. Typically, if you try back after a few minutes
the medication history will be available.
In the Filter By section, at the bottom of the
dialog, select any Medication,
Prescriber, and/or Last
Fill Date range you would like to filter the medication history
for, as needed, and then click the Filter
button.
You can then view the medication by scrolling
through the Medication section, reconcile the medications, or print the
medication history. When reconciling and printing, only those medications
that are included in the filter criteria will be printed or reconciled.
To print the medication history for a patient, click the Print
button.
To reconcile the medications for a patient, click the Reconcile
button.
When reconciling the medications, a Clinical Information
Reconciliation (CIR) dialog will appear that allows you to view and reconcile
the various medications, broken into the patient’s Current
Chart Medications, Available Medications
from Surescripts Medication History, and a Final
Merged List. Each list will show the available medication (name,
start and last modified dates, last fill date, and sig information) detail.
Medications in the Available Medications from Surescripts Medication
History list are color-coded to denote the level of medication information
available and the ability of importation. Click the Legend
option for a complete listing.
Medications can be moved individually by highlighting the applicable
medication, and then clicking the Add
button, or in bulk using the Add All
button. Each medication also includes a Skip
checkbox that can be manually selected, but will automatically be checked
if the medication already exists, has an end date that has passed, or
if there isn't enough information to import the medication.
The Medications that have been added will show in the Final Merged
List and labels will be updated to show their status as added.
New medications added to the Final Merged List can be edited by using
the Change button (except for
controlled substances which cannot be changed during the import process).
This will open the Prescribe Medication dialog with as much of the available
information found in the Surescripts Medication History pre-filled. The
Prescribe Medication dialog will also show the original name, dates, and
text from the import at the bottom of the dialog for reference.
An added medication can be removed from the list and existing medications
can be discontinued on either the final or current list. If a medication
is discontinued, the End Medication dialog will appear and then the medication
will be marked as ended.
After all the applicable medications have been reconciled, click the
Confirm button. The system will
then import the medications in the Final Merged List, and after confirmation
messages have been satisfied, you will return to the Clinical Information
Reconciliation (CIR) dialog with the medication information updated. An
Auto-generated drug log will be created listing the drug details for each
medication imported. Likewise, the patient’s facesheet will be updated
with the medications imported, and the medications will appear in the
patient’s History tab.
When finished reconciling medications in the Clinical
Information Reconciliation (CIR) dialog, click the Cancel
button.
In the Medication History dialog, you can reconfigure the filter items to view, print, and/or reconcile other medications in the medication history for the patient (steps 3 -5). When finished viewing, printing, reconciling, and importing medications, click the Close button.