Before sending e-prescriptions, you need to queue
the medication for sending. To do this, click the  button to the left of the medication,
and then click Queue for E-Prescribe.
button to the left of the medication,
and then click Queue for E-Prescribe.
NOTE: You are only allowed queue and
send a single controlled substance for e-prescribing at a time.
When you try to queue additional medications in addition to a controlled
substance, the system will generate a message indicating the inability
to do this. You still have the ability to queue and send multiple non-controlled
substances. However, you will not be able to queue a controlled substance
if there are other medications queued.
To send e-prescriptions, click the  button to the left
of the medication and then click Send
E-Prescriptions. This will send all medications that have been
queued. If you have multiple medications in a patient note, you can send
all of them at the same time, or selectively send individual medications.
button to the left
of the medication and then click Send
E-Prescriptions. This will send all medications that have been
queued. If you have multiple medications in a patient note, you can send
all of them at the same time, or selectively send individual medications.

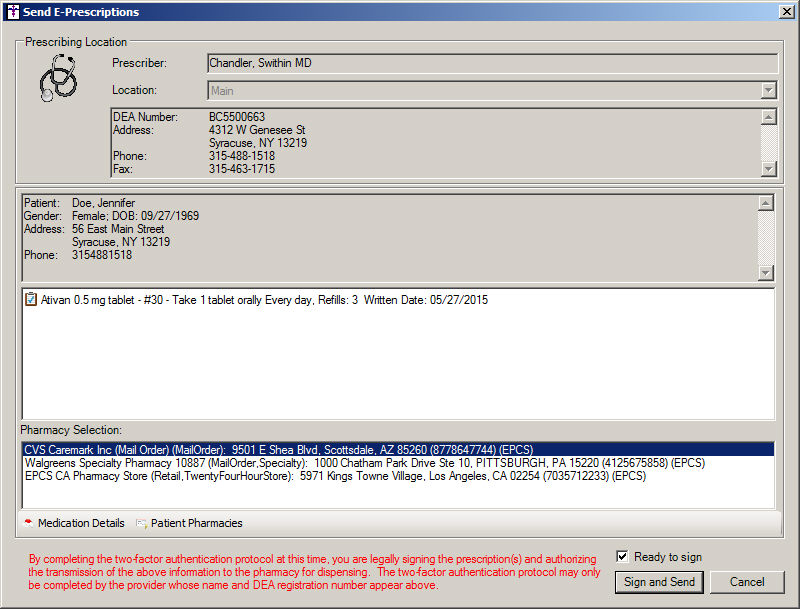
In the Send E-Prescriptions dialog, if you are
sending controlled-substances, the Location
field will become active when there are multiple locations allowing you
to select the proper location, and thereby the applicable DEA Number,
when sending the prescription. With the implementation of EPCS each provider/practice
location has a DEA Number attached to it.
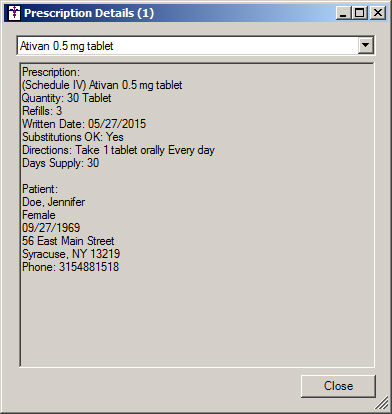
In the E-Prescriptions for... section, all of
the queued medications to be sent will be listed. Controlled substances
will have a green checkmark next to them. You can click the Medication
Details button if you would like to see the information that is
being sent for each prescription. In the Prescription Details dialog the
prescription information being sent will be summarized. If there are multiple
medications you can click the drop-down list at the top to change the
medication.
In the Pharmacy Selection section, highlight the
Pharmacy you want to send the
prescription. When sending controlled substances the selected pharmacy
must allow the e-prescribing of controlled substances.
NOTE: If the pharmacy information does not default, click the Patient Pharmacies button to select
a pharmacy for this patient. See the Add
Pharmacy Information for a Patient
for details on adding pharmacy information for a patient. .
After the pharmacy has been selected, if you are
sending only non-controlled substances, click the Send
button.
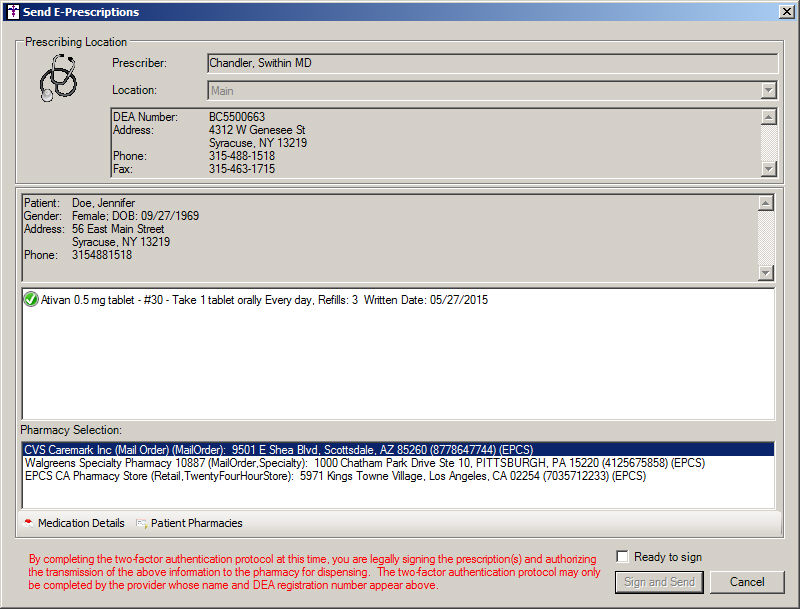
If you are sending a controlled substance, you must complete the two-factor
authentication protocol. Check the Ready
to sign option which will activate the Sign and Send button. Also,
the green checkmark next to the controlled substances will change to a
checked clipboard icon. You must now have your IndenTrust token plugged
into your computer. Once the token is plugged in, click the Sign
and Send button.
The system will then validate the security certificate with the IdenTrust
token inserted into the USB port of your computer. If the certificate
and token match, you will be promoted to enter your token password. Once
the password has been entered, click the OK
button. The e-prescription will then be sent.
NOTE: When you click the Ready to
sign option, if the provider in the Prescriber field is not set
up for EPCS, then a warning message will appear stating that this provider
is not authorized to E-Prescribe controlled substances and you will not
be able to continue.
NOTE: If the IndenTrust USB token is not plugged into the computer
when you click the Sign and Send
button, the system will produce a warning message indicating that the
token is not plugged in and you will not be able to continue.