Open a patient's chart note.
Click the Open
Diagnosis Checklist  button in the checklist bar to
access the Diagnosis checklist.
button in the checklist bar to
access the Diagnosis checklist.

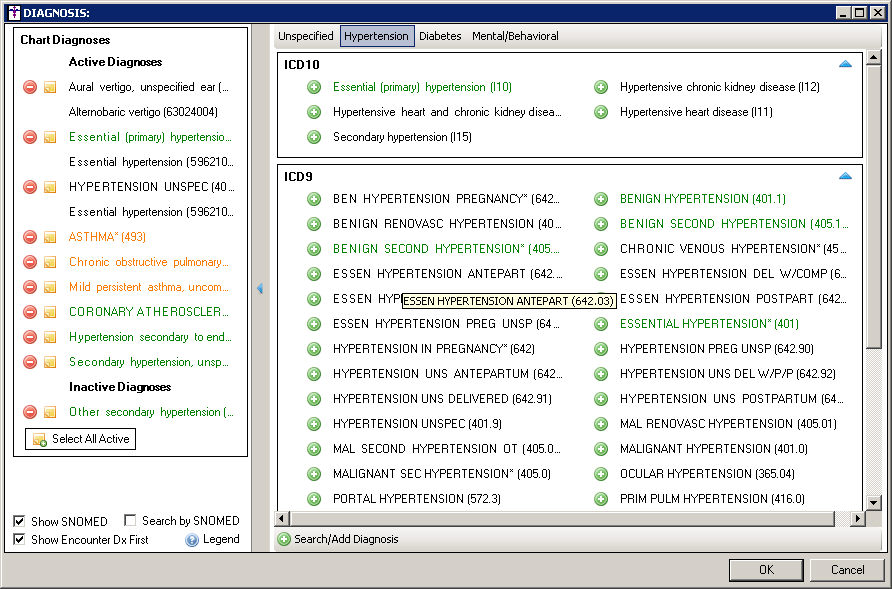
In the left pane of the Diagnosis Checklist, in
the Chart Diagnoses section, click the Note
Diagnosis  button next to the diagnosis you would like to inactivate.
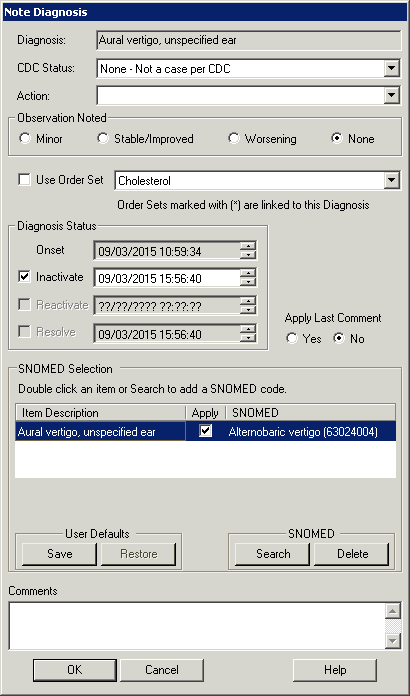
In the Note Diagnosis dialog, the diagnosis that
you want to inactivate will appear in the dialog box. If this is not the
diagnosis you want to inactivate, click the Cancel
button.
Select an Action
for the diagnosis, if applicable.
In the Observation Noted section, check any applicable
Observation as needed.
Check the Inactivate
option and configure the Date
on which this diagnosis is inactive.
Click the Yes
radio button under the Apply Last Comment
option if you would like the last comment made from the preceding note
to populate in the Comments field.
NOTE: The Yes option will default if the Apply Last Diagnosis Comment
option is selected in the General preferences.
NOTE: Clicking the No option
will remove any defaulted comment that has been populated from a preceding
note. Likewise, you also have the ability to click the Yes
option, read the note for reference, and then click the No
option no remove the previous comment, and then add a new comment if needed.
The SNOMED section of the Note Diagnosis List
dialog allows you to map the diagnosis code to the applicable SNOMED CT
code. When mapping diagnosis codes to SNOMED CT codes, there are three
types of mapping that can take place: mapped, multiple mappings are available,
and no mappings are available.
When a diagnosis code is mapped directly to a SNOMED CT code, the diagnosis
will be listed in the Item Description column, and the applicable code
will appear in the SNOMED column and a disclaimer will be displayed below.
You have the ability to remove the SNOMED code by highlighting the code,
and then clicking the Delete button.
You also have the ability to search for different or additional SNOMED
codes by clicking the Search button.
Once the applicable SNOMED codes are attached to the diagnosis, you can
set the SNOMED code or codes as a default for that diagnosis by clicking
the Save button. When multiple
SNOMED codes are available you have the ability to decide which codes
will be attached for this particular instance of the diagnosis by checking,
or unchecking, the corresponding Apply
field without disrupting the default setting for subsequent iterations
of that diagnosis.
When a diagnosis code has multiple SNOMED CT codes that it can be mapped
to, "Multiple mappings are available" will be displayed above
the Disclaimer. Click the Search
button to search for the applicable SNOMED codes. In the Search List dialog,
the Category field lets you search National
Library of Medicine Suggested Mappings, or <All>
SNOMED codes. The former category option will default when multiple mappings
are available. Once the applicable code or codes are selected they will
appear in the SNOMED column. As before, you can remove a SNOMED code by
highlighting it, and clicking the Delete
button; you can set the SNOMED code or codes as a default for that diagnosis
by clicking the Save button; and
when multiple SNOMED codes are available you have the ability to decide
which codes will be attached for this particular instance of the diagnosis
by checking, or unchecking, the corresponding Apply
field without disrupting the default setting for subsequent iterations
of that diagnosis.
When a diagnosis code has no mappings available, No mappings are available"
will be displayed above the Disclaimer. Click the Search
button to search for the applicable SNOMED codes. Once the applicable
code or codes are selected they will appear in the SNOMED column. As before,
you can remove a SNOMED code by highlighting it, and clicking the Delete button; you can set the SNOMED
code or codes as a default for that diagnosis by clicking the Save
button; and when multiple SNOMED codes are available you have the ability
to decide which codes will be attached for this particular instance of
the diagnosis by checking, or unchecking, the corresponding Apply
field without disrupting the default setting for subsequent iterations
of that diagnosis.
In the Comments field, enter or modify any free-text
Comments concerning the inactivation
of this diagnosis if needed. Do note, there is a 1020 character limit
to this field.
When finished, click the OK
button. The diagnosis will now be moved from the Active Diagnosis list
in the Chart Diagnosis section of the left pane of the Diagnosis checklist,
to the Inactive Diagnosis list in the Encounter Diagnosis section of the
left pane of the Diagnosis checklist.
When all the applicable changes have been made, click the OK button in the Diagnosis checklist. The diagnosis will be transferred from the Problem/Diagnosis List to the Inactive Diagnosis List in the patient's Face Sheet. Likewise, the diagnostic event will be tracked in the History tab.