
In catastrophic situations (fire, tornado, etc.), it is impossible to guarantee absolutely NO data loss unless real-time offsite data backup or data mirroring is employed via co-location. If desired, STI can work with and recommend third party service providers for this type of solution.
STI does require the following reasonable measures to prevent or mitigate data loss in the case of hardware or power failures. These measures will either ensure the system continues operation while remediation occurs (i.e. replacing a mirrored hard drive, restoring power, etc.), or that the system can be restored to the state it was in just prior to the failure (with no loss of data):
Use a UPS Backup. This guarantees continued operation
of the system should a power failure occur. It also allows for a systematic
shutdown of the system for an extended power failure until power can be
restored.
Use a RAID 1 Hard Disk Array. This guarantees
no data loss in the case of a single point hard disk failure. In that
case, the system will continue to run while one of the hard disks in the
array is replaced.
If not using a RAID 1 Hard Disk Array, configure the database transaction log to reside on a different hard disk than the database itself. In the case of database corruption or a hard disk failure on which the database resides, the transaction log can be applied to the previous backup of the database to restore the data up to the point at which the problem occurred. Alternatively, if the transaction log is corrupt or the hard disk on which it resides crashes, the database resides on a different hard disk and is therefore intact. The database transaction log, if corrupt, would be started new whenever a backup is performed.
The backup process of the databases used by ChartMaker requires no user intervention. The STI HDS Service which is created during the initial install creates a full backup copy of each database on one of the system hard drives and then that backup file is copied to tape using Backup Assist. The backup file is of file type BAK and the name will indicate if it is the PCare, Audit, Master, or HealthPortalClient database. Backup Assist runs nightly. When the database is backed up the SQL Server transaction log file is purged.
Microsoft SQL Server is a high performance, client/server relational database management system (RDBMS) designed to support high-volume transaction processing. It requires very little maintenance and intervention on the part of the end user. It incorporates a transaction log that assures atomicity, consistency, isolation and durability (ACID). Transactions are either fully committed to the database or rollback as though they never happened.
In the unlikely event that a database or databases get corrupted during normal operation, the Database Console Commands (DBCC) can be utilized to restore the integrity of the data and indices inside the physical database files.
NOTE: The following procedure is to be used by the end user only with the assistance and guidance of STI Computer Services Inc.
By far the most widely used command to check the status of any database is:
DBCC CHECKDB
This command can be run from Microsoft SQL Server Management Studio 2005 (SSMS) to recover databases with specific integrity problems. The end user would be instructed by the STI Support Department to start up SSMS, and connect to the database in question. There are currently three databases that could be involved with any recovery situation that occurs and they are PCare, HealthPortalClient and AuditPCare.
This DBCC command has two purposes: to check a database, and to correct it.
The first option on the command looks like this for the PCare database:
DBCC CHECKDB (’PCare’, NOINDEX)
The command above checks the PCare database but not its indexes. This won’t take long at all. The output returned will tell you if there are problems with the database. If so, check to make sure your backup is handy and then you can run the next level of this command:
DBCC CHECKDB (’PCare’, REPAIR_FAST)
This command will attempt to fix many errors, but won’t allow any data to be lost. If that doesn’t work, the next level of the command is:
DBCC CHECKDB (’PCare’, REPAIR_REBUILD)
This command takes longer, but will also correct the indexes (if it can). It will also not allow data loss. Should this command not correct the errors, you will need to restore the database from the last backup.
The above procedure can and should be run against all three application databases should problems occur.
When a SQL Server Database is not recoverable, the previous night’s
backup tape must restore the BAK file for the database that has failed.
Once the file is on one of the system’s hard drives, the user starts Microsoft
SQL Server Management Studio (SSMS) or SQL Server Management Studio Express.
Both user interface programs function identically for restoring a database.
Log on to Windows Server on the STI Application Server and then start SSMS. You will be prompted again for authentication information and server to connect to in order to access SQL Server. After SSMS has authenticated you, it will display the Object Explorer panel on the left side of the window showing that you are connected to the server. If Object Explorer is not visible, go to the application’s menu bar select View > Object Explorer.
Right click the Databases Folder and select Restore Database… from the context menu. The following dialog box will appear:

Select the To Database from the list box. Next select the From Device radio button. Click the browse button (…). The dialog box that appears will allow you to select a backup or add a backup location.
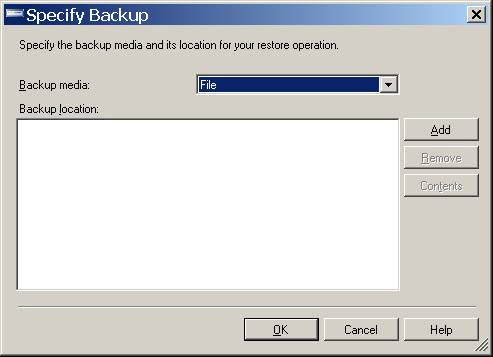
Select Add and browse to the location of the BAK file. Click OK.
The Restore Database Dialog will now look like this:
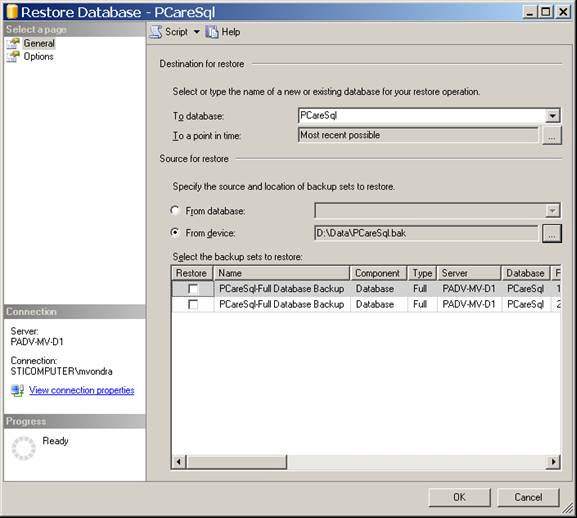
Click the checkbox in the Restore column of the data grid and then click OK. The backup will immediately start restoring the database This process may take several minutes or more depending on the speed of your server and the size of the database being restored.