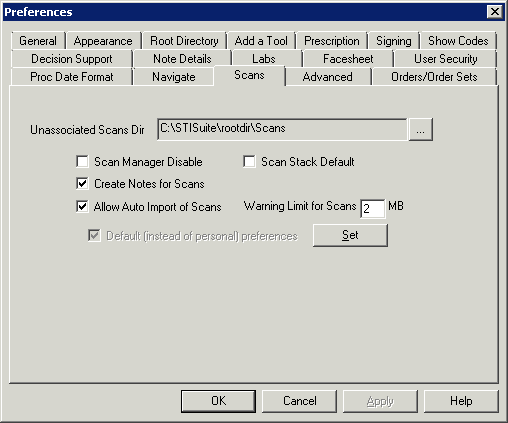
Click Edit >
Preferences.
Click the Scans
tab.
In the Unassociated Scans Dir field, click the
 button, and browse to the location of the scans folder.
Check the Scan
Manager Disable option if you want to disable access to the Scan
Management dialog.
NOTE: When this option is activated you cannot access the Scan Management
dialog, however, you can still scan documents into a chart note via the
Note tab, and clicking Scan Document which enables the legacy method of
scanning via the Scan Pages dialog.
Check the Create
Notes for Scans option if you want the scanned image to be embedded
into a chart note allowing you to add and modify information within that
note (as opposed to being able to only modify Chart Header information).
In the Organizer the scanned images embedded into a chart note will have
a format of "Note (Scan)" to easily distinguish these from other
formats.
NOTE:If this option is activated the Undo button in the Scan Management
dialog will be disabled.
Check the Scan
Stack Default option if you want to default the Stack scans into
one Note option in the Scan Management dialog to be checked, thereby allowing
you to stack (select multiple) scanned images into one chart note.
Modify the Warning
Limit for Scans value as needed. This option allows you to determine
the maximum threshold for scan size (MB) before a warning is generated
when inserting a scan into a patient's chart indicating that a particular
scan exceeds this value. The value in this field must be between 1 and
10 MB.
Check the Allow Auto Import of Scans option if you want to be able to batch import PDF files via the Scans tab in the Scan Management dialog.
Once the applicable preferences have been configured,
click the Set button.
When finished, click the OK
button.