Click Edit >
Preferences.
Click the Facesheet
tab.
Click the Personal radio button if you want the facesheet layout to be fully configurable by and for you only; or click the Global radio button if you want the facesheet layout to be based upon the Global Facesheet and will not be configurable on an individual basis. Do note, only users with the Global preference will be able to see globally created sections.
Once the Facesheet preference has been selected,
click the Set button to activate
that preference.
NOTE: When the Personal option is selected, the Edit Personal Facesheet
button will be accessible after you click the Set button. You can add
and modify the Facesheet layout as well as adding and modifying sections
for the facesheet via this button.
When the Global option is selected, the Edit Global Facesheet button
will appear after you click the Set button. Only users with the Facesheet
user privilege are able to edit the global facesheet. When a user has
the Facesheet privilege, the Edit Global Facesheet button will be accessible
allowing access to the Global Facesheet Settings dialog.
If the Personal
option was selected go to step 6. If the Global
option was selected go to step 14.
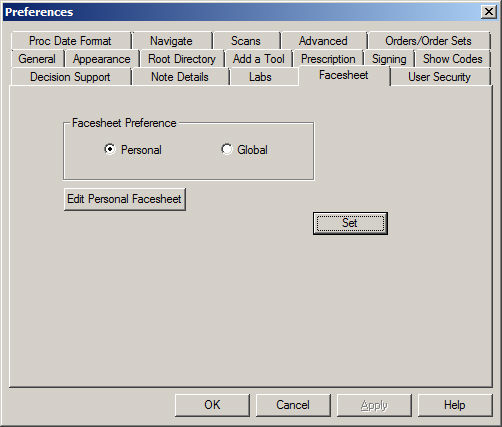

Click the Edit
Personal Facesheet button if you want to modify the Personal Facesheet
layout. If you are not modifying your personal facesheet you can skip
to step 13.
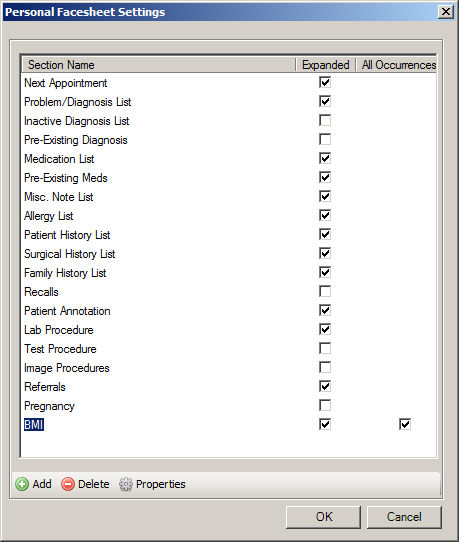
In the Personal Facesheet Settings dialog you
have the ability to modify the Section Name of an entry, decide which
sections will appear Expanded or closed when there is applicable information
in that section, create new sections, modify the properties of Pregnancy
and any other user-created sections, select whether or not to include
All Occurrences or just the most recent occurrence in any user-created
sections, and delete any user-created sections.
To modify the section name of a section, click into the corresponding
Section Name, and then modify
the section name as desired.
Check the corresponding Expanded
box for those sections you want to appear expanded when applicable information
is populated in those sections. If the corresponding box is unchecked
then that section will appear collapsed in the chart, and you will need
to click the + to view information in that section.
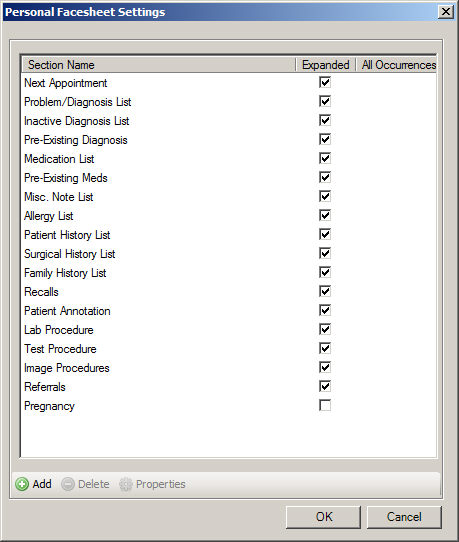
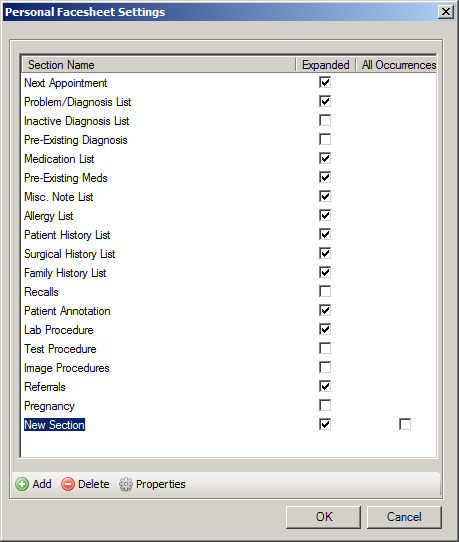
To add a new section, click the Add
button. A New Section will appear at the bottom of the list. You can modify
the name of the new section as needed by clicking the New Section name
and then typing the new applicable section name, and then click the Properties button to configure what
information will appear in that section.
NOTE: Once a section has procedures and/or results configured, you
can add to or modify that information by highlighting that section and
then clicking the Properties button.
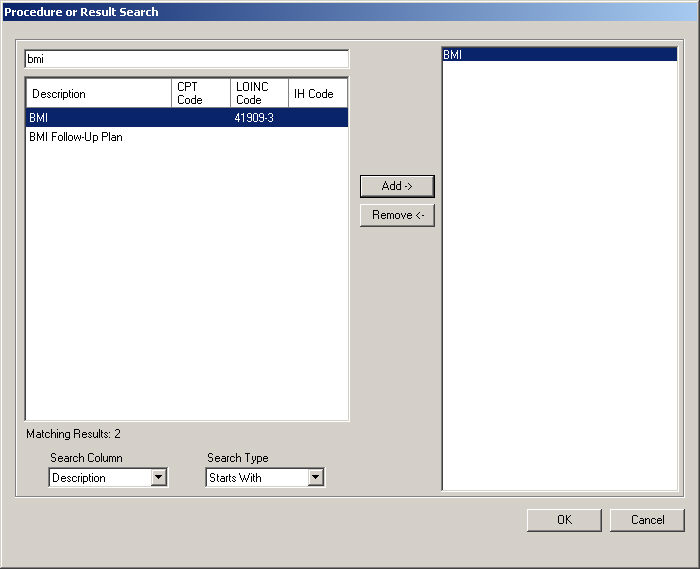
In the Procedure or Result Search dialog, select
the applicable Search Column and
Search Type, and then begin typing
the procedure or result you want to add to this section in the Description
field. The system will return conditions that match that description for
the Search Column and Search Type selected. Once the applicable procedure
or result has been located, highlight that Procedure/Result,
and then click the Add button.
To remove a procedure or a result from a section, highlight the item
you want to remove in the pane to the right, and then click the Remove button.
When you are finished adding and removing applicable procedures and
results for this section, click the OK
button.
Check the corresponding All
Occurrences box for those user-created sections you want all occurrences
of the applicable procedures and/or results to appear for that section.
If the corresponding box is unchecked, only the most recent occurrence
for each applicable procedure and/or result configured for that section
will appear.
To delete a user-created section, highlight the
section you want to delete, and then click the Delete
button.
When finished, click the OK
button.
Click the Edit
Global Facesheet button if you want to modify the Global Facesheet
layout. If you are not modifying the Global Facesheet you can skip to
step 21.
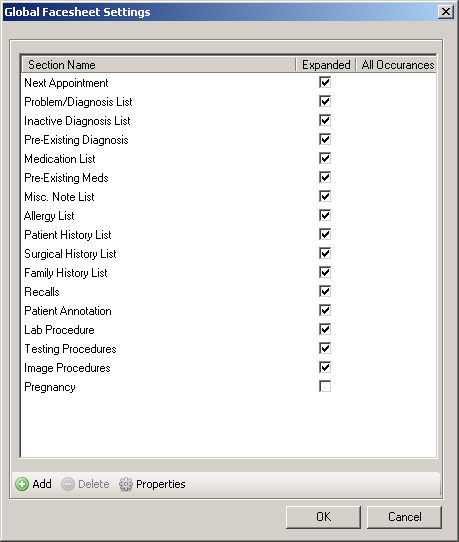
In the Global Facesheet Settings dialog you have
the ability to modify the Section Name of an entry, decide which sections
will appear Expanded or closed when there is applicable information in
that section, create new sections, modify the properties of Pregnancy
and any other user-created sections, select whether or not to include
All Occurrences or just the most recent occurrence in any user-created
sections, and delete any user-created sections.
To modify the section name of a section, click into the corresponding
Section Name, and then modify
the section name as desired.
Check the corresponding Expanded
box for those sections you want to appear expanded when applicable information
is populated in those sections. If the corresponding box is unchecked
then that section will appear collapsed in the chart, and you will need
to click the + to view information in that section.
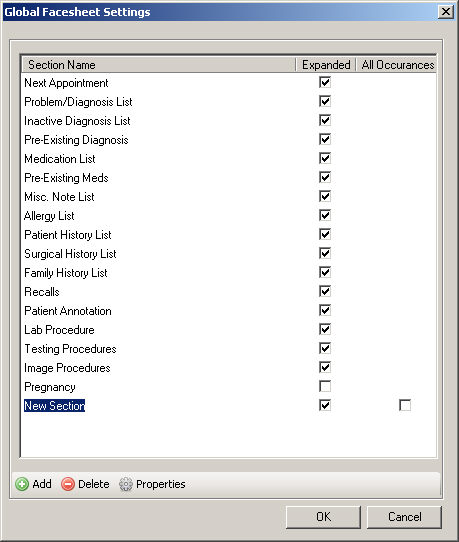
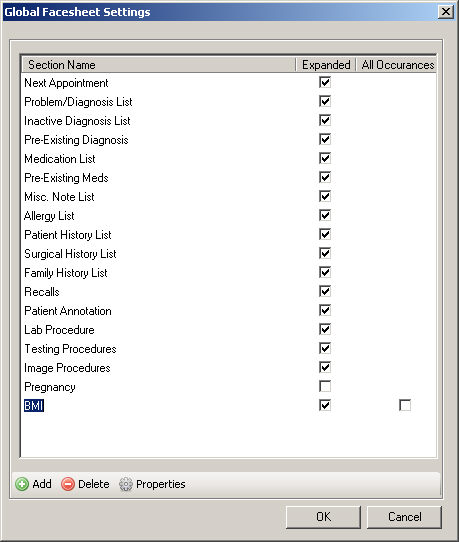
To add a new section, click the Add
button. A New Section will appear at the bottom of the list. You can modify
the name of the new section as needed by clicking the New Section name
and then typing the new applicable section name, and then click the Properties button to configure what
information will appear in that section.
NOTE: Once a section has procedures and/or results configured, you
can add to or modify that information by highlighting that section and
then clicking the Properties button.
In the Procedure or Result Search dialog, select
the applicable Search Column and
Search Type, and then begin typing
the procedure or result you want to add to this section in the Description
field. The system will return conditions that match that description for
the Search Column and Search Type selected. Once the applicable procedure
or result has been located, highlight that Procedure/Result,
and then click the Add button.
To remove a procedure or a result from a section, highlight the item
you want to remove in the pane to the right, and then click the Remove button.
When you are finished adding and removing applicable procedures and
results for this section, click the OK
button.
Check the corresponding All
Occurrences box for those user-created sections you want all occurrences
of the applicable procedures and/or results to appear for that section.
If the corresponding box is unchecked, only the most recent occurrence
for each applicable procedure and/or result configured for that section
will appear.
To delete a user-created section, highlight the
section you want to delete, and then click the Delete
button.
When finished configuring the Global Facesheet Settings, click the OK button.